You’ve been thinking about replacing your windows for quite a while now, and you know the usual questions to ask any prospective contractor. Do you give free estimates? How much will the windows cost? How much is labor? How long have you been in business? Can I have three references? Are you bonded and insured? Will you be doing the window replacement, or do you use subcontractors? What windows do you use? What’s the warranty on your work?
We’re not here to waste your time with fluff. Instead, we’re diving into real questions that will reveal whether a potential contractor has any business even looking at your windows let alone refenestrating your entire home. After all, the life of a window anywhere near Oregon’s Columbia River Gorge is tough. Winds blow long and hard, and winters are just plain cold. You need a contractor who knows what they’re doing and why they’re doing it. Here are four real questions to ask and the information you should be listening for during the interview.
The Best Choice Question: Are you recommending full-frame window replacement, retrofit windows or sash replacement kits, and why are they better for my particular situation versus the others?
A contractor must clearly state which option they’re proposing so that you understand what you’re paying for and so that you can tell why and how your cost estimates differ. One estimate that seems economical may use retrofit windows or sash kits. Meanwhile, another may include full-frame replacement windows and essential repairs that the other contractor would rather skip or isn’t equipped to handle.
Your contractor should be able and willing to explain the differences between full-frame replacement windows, retrofit windows, and sash replacement kits and why one is a better choice than the others for your particular situation:
- Sash replacement kits are the easiest, cheapest option. To install them, the contractor removes the old sashes and jamb liners—the spring-loaded vertical tracks that hold the sashes—replacing them with new. The existing window frames must be square, level and plumb, with no bowing and no other associated maintenance issues.
- Retrofit replacement windows are window assemblies designed to sit inside an existing window frame. To install them, the contractor strips the old window to its frame before fastening a replacement window assembly into the jambs. The secondary frame results in a slightly decreased total glass area – Slim-frame replacement windows are at a premium, but cheaper, flimsier versions can be difficult to level and square for proper operation. Much like sash replacement kits, retrofit replacement windows need a square, level window frame.
- Full-frame replacement windows are also called tear-out or new-construction windows. The contractor removes the entire original window as well as the surrounding materials in order to install a whole new window into the original opening in the stud framing. Full-frame windows are a complete assembly, with their own frame, and their installation requires the same weather barrier conventions essential to new construction.
If rot, water damage or structural issues are causing your current windows to fail, full-frame replacement windows may be your best—and only—option because they allow you to fix the problem, not just conceal it only to have your new windows fail within a short period of time. Neither sash replacement kits nor retrofit replacement windows will fix or outlast deeper issues.
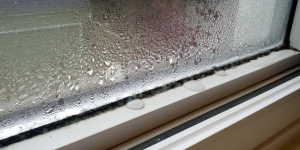
The Water Question: How do you prevent problems with moisture intrusion, leaks, mold and rot?
 Your contractor should nod their head and launch into a discussion of sealants, proper prep, drip caps, sill pans, back dams, and flashing or flex tapes that goes something along these lines.
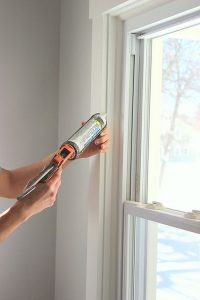
- Replacement windows and kits are fastened into the existing window frame’s jambs with screws. That holds the window in place, but it won’t keep out weather. Before the windows are set into the frame, the contractor must apply an even bead of caulk sealant designed specifically for exterior windows to the frame’s perimeter. Then, when the replacement window is inserted, the sealant forms a weathertight bond that includes the screw fasteners. An additional bead of sealant on the interior and exterior perimeters usually completes the seal.
- Full-frame replacement windows require everything that a new construction window would require and often more because of damages that must be repaired first.
- Any sheathing or other materials damaged by moisture must be replaced.
- Drip cap above a window will ensure water sheds over the window’s exterior instead of creeping underneath.
- Adhesive flashing tape systems and weatherproofing sealants ensure seamless integration with a home’s weather barrier and sheathing.
- Sill pans and back dams prevent moisture from wrapping underneath the window’s edge.
- Full-frame windows require sealant according to the manufacturer’s instructions—typically a bead spanning the top and sides applied so that it will also seal the screws used to fasten the window in place. In high-wind zones, the full number of screws are recommended.
- Exterior flashing should cover the window’s flanges to seal edges with underlying surfaces.
Everything that the contractor explains and does should be focused on maintaining drainage channels while keeping moisture from leaking, creeping or being driven past your home’s weather barriers. In fact, an experienced contractor should be able to show you the products and materials they would use on your job.
The Air Question: How do you prevent air gaps, drafts and energy loss?
 Chances are, many prospective contractors will start talking about caulking and insulation, but stopping air starts at the very beginning of the window replacement process and continues to the end:
- A window contractor needs to be prepared to correct any problems with the existing window’s frame, sill and associated areas that have gaps or damage. A replacement window may be airtight, but if the area around it is compromised, you’ll still have leaks.
- Correct measurements before and during installation are essential. Windows need a snug, just-right fit. If the new window is too small, the resulting loose fit will make it difficult to seal air gaps effectively in the long-term.
- Measure height left, center and right. Then, measure width at the top, middle and bottom. If height or width measurements are inconsistent, your contractor will use the smallest measurement for each. However, if either height or width measurements range more than ¼ inch, a full-frame replacement may be recommended to ensure a successful installation.
- Measure diagonals, from frame corner to frame corner. Again, if measurements are out of square, your contractor may recommend a full-frame replacement window. Even if the frame is square, the window itself needs to remain square as well throughout the installation.
- For replacement windows, sealant in the frame as well as around the interior and exterior perimeters should prevent air gaps.
- Older windows may have operated thanks to weight pockets that flank the window frame and can remain a source of drafts and moisture. Insulating these pockets with foil-faced rigid foam insulation and sealing with foil tape or flashing will eliminate drafts and serve as a vapor barrier and insulator.
- For full-frame window replacements, low-expansion foam insulation filled against the top and sides serves as a vapor barrier and insulation. A seal coat of foam insulation at the bottom should allow exterior drainage while preventing interior air gaps.
- Exposed edges or seams need a finishing bead of sealant to maintain a weathertight, airtight seal.
The methods used to prevent moisture intrusion likewise serve to prevent air gaps. That’s why they’re so important.
The Real Question: Why do replacement windows fail?
This one may make a prospective contractor wince, but a reputable, experienced professional should be willing to not only answer the question but also tell you how they try to prevent those failures. Unfortunately, some window replacements—sash kits, replacement windows or full-frame windows—fail to perform as intended, and when that happens, it’s often due to some common culprits:
- Replacement windows or sash kits were installed despite conditions requiring a full-frame window replacement. Signs of moisture damage, rot or other issues were ignored.
- Measurements weren’t accurate, so the fit isn’t snug, and there’s too much reliance on shimming, foam and caulk.
- The window frame wasn’t square, level or plumb, so water collects in places where it shouldn’t. Windows may also suffer strain that impacts function or lifespan.
- Surfaces weren’t properly prepped or repaired. Dirt, debris or peeling paint compromised sealants’ ability to adhere.
- Windows weren’t properly centered or aligned, leaving uneven gaps difficult to seal and insulate properly.
- Insufficient or improper sealants were used. In short, inexpensive caulks were used rather than exterior sealants designed to repel moisture.
- Window flashing was insufficient or improperly applied. Any unsealed seam, break or edge allows water and air access and compromises the weather barrier.
- Too few screws were used. Window flanges are lined with holes, but contractors may not use all of them. Failure to use enough may not enforce an effective seal.
- The wrong types of insulation were used. Foam insulation should be low- or minimal-expansion types designed specifically for insulating windows without causing bowing or distortion.
- The replacement windows may have been of inferior quality or have had defects.
Tum-A-Lum Lumber: Oregon’s Answer to All of Your Window Replacement Questions
New windows are a major investment in your home’s comfort, beauty and energy efficiency. All of those aspects, however, depend on the quality of the windows and the skill, knowledge and experience of the professional installing them. If you want to be sure you’re getting the best of everything, come see us at Tum-A-Lum Lumber. Visit our showroom in Hood River, or talk with our pros at our other two locations in Pendleton and The Dalles. Go ahead, and ask your questions. There’s no fluff here, only knowledge, experience, a willingness to help, and—of course—lots and lots of windows.